Gag's Camper Way, Inc.
55151 210th Lane
Mankato, MN 56001
(507) 345-5858
(800) 714-7895
Gag's Camper Way, Inc.
55151 210th Lane
Mankato, MN 56001
(507) 345-5858
(800) 714-7895
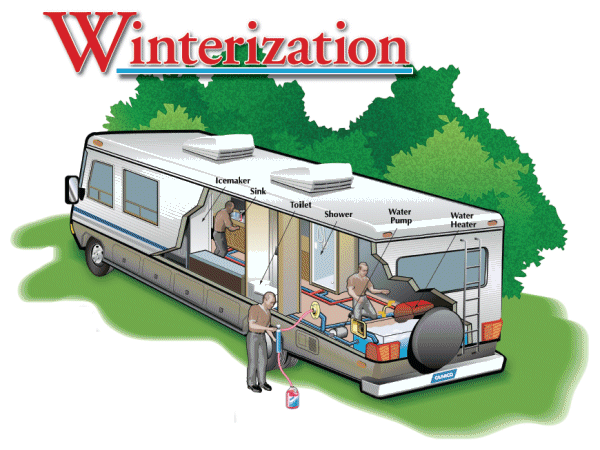
It's time to store your RV for the winter. Follow this guide to properly winterize and prepare your RV for long or short term storage. Note: use RV/Marine antifreeze for the winterization of your RV. It is safe for fresh water plumbing. You can also contact our Service Department to have us winterize your camper.
Let's begin by talking about how your RV water system works.
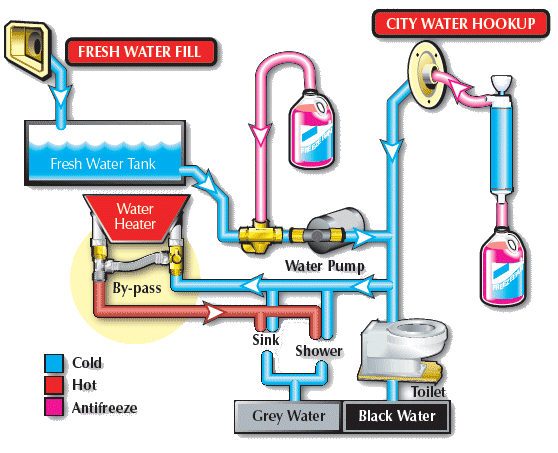
Your RV's water system draws water either from your fresh water tank and/or from the city water hookup. From the fresh water tank, a water pump is used to push water through the RV. (No pump is needed for water coming from the city hookup.) The water from the water tank and city water hookup will always be cold. To get hot water, the water must flow from your water pump into your water heater. The water is then heated and flows to your hot water fixtures such as sinks and shower. When winterizing your RV you will need to by-pass the water heater.
| 1. | Disconnect the outside water source. |
| 2. | Drain the water system. There should be up to three low-point drains. One for the cold water lines, one for the hot water lines and one for the fresh water tank. Open the petcocks to drain as much water from your pipes as possible. Open the water taps at all the faucets, showers and flush the toilet to drain any remaining water from the system. |
| 3. | Drain Water Heater. On the outside of your water heater either remove the drain plug in the lower left had corner or open the drain valve in the same location. By leaving a faucet open on the hot water side, air will equalize pressure and easily drain the tank. You may want to use a bendable straw to put into the drain hole while water is coming out to create a siphon which will drain all the water to the bottom of the rounded tank. |
| 4. | By-pass your water heater. |
| By-passing the water heater can save you money by not having to fill the water heater tank with anti-freeze, saving as much as 6 to 10 gallons of anti-freeze. Some RVs come with a by-pass system pre-installed but many do not. | |
| Before you start: | |
| - Make sure to turn off all power to the water heater (the electric water heaters usually have their own power on-off switch). | |
| - Make sure the water heater gas pilot is NOT lit. |
There are three methods for by-passing the water heater:
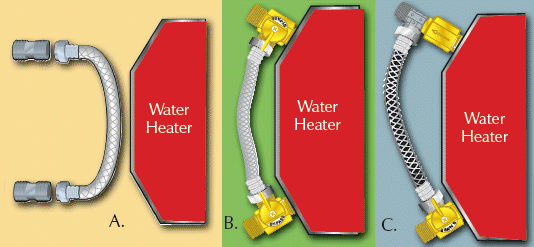
| A. | Seasonal By-Pass Kit. This temporary by-pass allows you to hook up for winterizing and remove in the spring for reconnecting the system. If your water heater does not have a by-pass kit installed you will need to use a temporary kit that has two male-to-male connections and a short length of hose to bypass the water heater. |
| B. | Permanent By-Pass Kit. This is a simple and permanent installation of an elbow by-pass kit that allows you to quickly disconnect the hater heater by turning two valves at both the cold water entry and the hot water exit of the water heater. |
| C. | Permanent Quick-Turn By-Pass Kit. The easiest system to use is a permanent installation of a single valve and a back-flow preventer. The valve is located on the cold water entry and diverts water to a hose and past the water heater. A back-flow preventer is installed to prevent water from flowing into the water heater through the hot water exit. |
| 5. | Blow out the lines. After draining as much water as possible, it is recommended that a blow out plug be attached to the City Water Intake. Apply air pressure from an air compressor (not to exceed 45 PSI) to drain the remaining water. Although blowing out the remaining water is not required, the remaining water will dilute your anti-freeze. Close all faucets and petcocks when complete. |

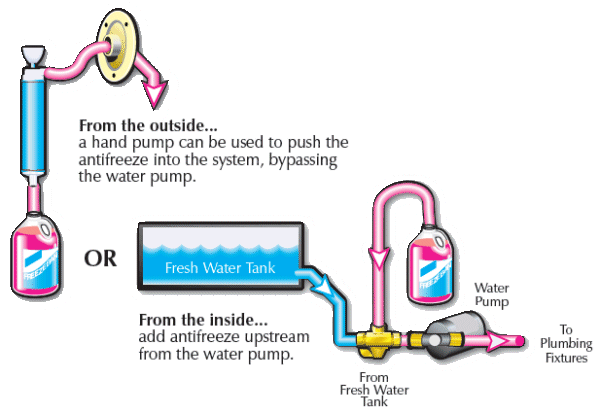
| 6. | Add Anti-Freeze. You can add anti-freeze either from
the inside using a Water Pump Conversion Kit or from the outside using a
hand pump. Be sure to check your progress by opening up one faucet at a
time, starting from the highest and working to the lowest point in the
fresh water system. Begin with the kitchen faucet. Open the HOT side of
the kitchen faucet ONLY. Pump anti-freeze until flow from the faucet
becomes very pink. This will indicate that all water has been flushed from
your system. Close the faucet. Repeat on the COLD side. Continue to the
next lower fixture. This is normally the bathroom sink, then the shower
and finally the toilet. Don't forget your outside shower if so equipped.
Also, open the two low point lines for the HOT and COLD water lines to
make sure anti-freeze gets to the valves and that no water is trapped.
Finally, close all faucets and the low point valves. ** Note: If you use the hand pump from the outside method, remember to manually add antifreeze to your water pump OR if you use the water pump conversion kit method, remember to manually add antifreeze to the water line and the city water intake check valve (this is done by turning off the pump, removing pressure from the system by opening a faucet; then from the outside remove the screen at the city water intake and push in slightly on the check valve to purge any water from the line until pink anti-freeze comes out). ** |
| 7. | Pour at least 2 pints of anti-freeze into all sink and shower drains. The ice maker, washing machine and external shower will also need to be winterized. Look for this information in your appliance manuals. |
| 8. | Drain and dump your gray and black water tanks. Remove battery, charge and store in a safe location. |
| 9. | You are done winterizing. There are two options at this point. |
| Option 1. Leave the anti-freeze in the system until
spring and then summerize. You should reinsert the water heater drain plug
to keep dirt, debris and insects out of the water heater. Option 2. Drain the anti-freeze out of the system by opening the low points in the lines and letting gravity drain the anti-freeze. When the anti-freeze is removed you can prepare your camper for summer use by closing the low points, putting the water heater drain plug back in and removing the water heater by-pass. There will either be nothing but air in your water system or some anti-freeze where it cannot drain from. Either way, your water system will be protected for the winter and your camper will be ready to go in the summer. All you will need to do in the spring is run water into the system and flush the remaining anti-freeze from your water lines. DO NOT ADD WATER UNTIL SPRING WHEN THERE IS NO CHANCE OF FREEZING. |
Also remember the following:
| - | Remove any food that can spoil or attract mice from your RV. |
| - | Clean storage areas, oven, range, refrigerator and areas around dinette. |
| - | Examine seals around exterior doors and windows. Caulk if necessary. |
| - | Check the roof for small leaks or other damage. Make repairs if necessary. |
| - | Check plumbing vents, roof vents and air conditioner shroud. |
| - | Disconnect your 120 volt line cord and store away. |
| - | Clean and store your sewer hose. |
| - | Replace bumper caps. |
| - | Park with emergency brake on and use wheel chocks. |
| - | Stabilize your RV. Make sure it does not rock when you walk inside it. |
| - | Keep RV out of direct sunlight if possible. |
| - | Now is a good time to wash and wax. |
| - | Clean the awning. Do not use a dish detergent. They contain de-greasers which can cause your awning to dry out and crack. Use an awning cleaner that will clean, moisturize and remove mildew. |
We are also available to winterize your camper for you. You can view our price schedule and contact us from our Service page, click here.